0diggsdigg
The most important is first step, it is a base of HDR Photoshop effect. Use command image > adjustment > shadow/highlightand set up values: shadows amount: 50%, tonal width 45%, radius 41 px; High-light amount 83%, tonal width 76%, radius 1120px
Duplicate layer "base" and set up its layer blending to Color Dodge. This blending gives picture strong colors and cause that light areas turn into pure white. In next step it will be repaired by another layer blending.

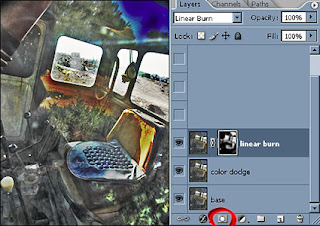
Do the same thing as in the second step, but layer blending is set up to Linear Burn now. You can see big black area in picture, it has to be eliminated. Set up foreground color to black and use command select > color range, tick off invert option (we want everything except black parts), fuzziness should be set to around 100. Now click on red marked icon, new layer mask will be added and black will dissapear. There are some ugly artifacts in the picture, to remove them, click on layer mask and use Gaussian blur filter.
Fourth step is easy, it profits from third step. Just duplicate layer "linear Burn", set its blending to Overlay, select layer mask and press ctrl+i (invert). This blending darkens too much light shadows and raises contrast. As you can see in this HDR Photoshop tutorial, Layers and its blending is very powerful tool.
Now it's time to adjust picture look, try to experiment with layer opacity. Optimal values are about 40% for layer "Overlay" and 55% for layer "Linear Burn". Whole HDR Photoshop tutorial is based on experimentation.
Set up foreground color to white and use command select > color range with fuzziness set up around 100. "Crawling ants" will appear around light areas. Duplicate "base" layer and move it up, then click on icon add layer mask. Select layer mask and soften it by Gaussian blur filter.
The last step colorize pictureinto red tones. Click on the red marked icon, select from menu gradient mapand make a gradient according to the model at the bottom of picture. If you don't have an experience with gradient maps, there is a short tutorial. After you are done with gradient map, load selection from layer mask of layer "light", invert it (select > invert) and click on add layer mask icon. Set up blending of layer "colorize" to hard light and finally set opacity to 72%.
I use some other adjustmenst to achieve HDR look. For example I fill white areas by photoshop generated clouds - filter > render clouds. If you have a question, feel free to ask in forum below.
You needn't do manually all this steps again and again, much easier is to use HDR Photoshop action, which do the all work for you.
See Photoshop effects offer
Another photos adjusted in the same way:
